How To Crochet For Beginners Step by Step Learning Pictures With 19 Patterns To Make
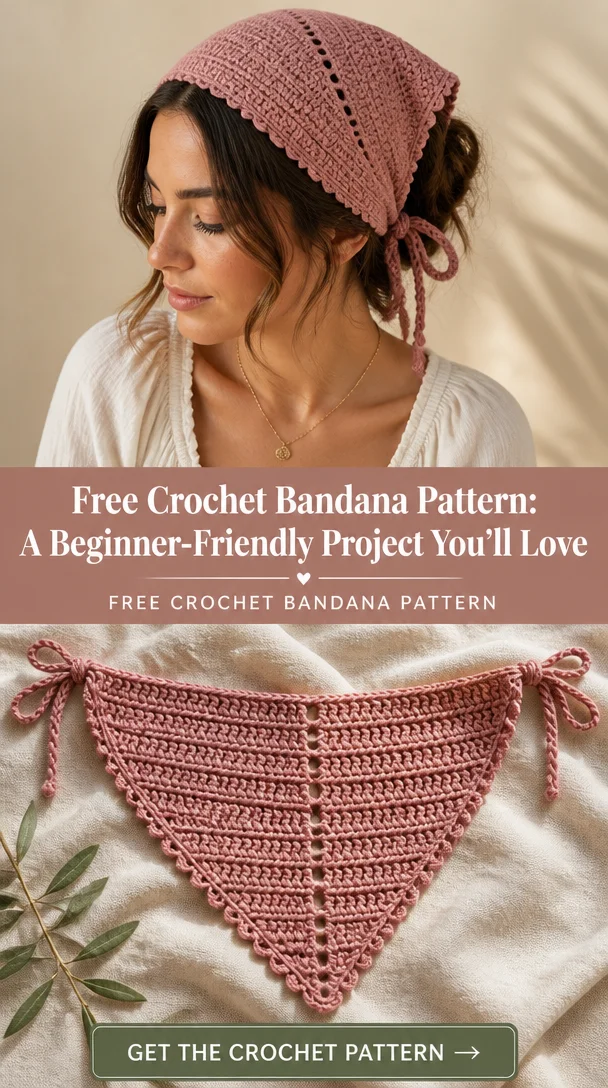
Crochet bandanas are the perfect blend of style and functionality, making them an essential accessory for any wardrobe. These versatile pieces can be used as headscarves, hair accessories, or simply as a fashion statement. With unique designs that add a personal touch, crochet bandanas can elevate your look while offering practicality during those warm summer months. The light, breathable fabric keeps your hair stylishly in place and protects against the sun. This pattern is perfect for beginners, as it guides you through each step with clear pictures, ensuring a beautiful result that you can proudly wear or gift.
Crochet Bandana Pattern Overview
- Skill Level: Beginner
- Finished Dimensions: Adjustable to preference
- Crochet Hook Size: Recommended hook size typically ranges from G (4.0 mm) to I (5.5 mm)
- Yarn Type: Cotton or cotton blend yarn recommended
- Yarn Weight: Light to medium weight (e.g., DK or worsted)
- Main Colors: Customizable based on personal preference
- Stitch Pattern: Basic stitches including chain, single crochet, and double crochet
- Construction Method: Worked in rows or rounds, depending on whether granny squares are used
- Approximate Completion Time: 2-4 hours
- Beginner-Friendly: Yes
- Techniques Used: Triangle construction or granny squares
Materials You’ll Need
- Yarn (cotton or a cotton blend)
- Crochet hook (size G to I)
- Yarn needle
- Stitch markers
- Scissors
- Measuring tape
- Optional: Decorative elements (buttons, beads)
Crochet Abbreviations
- ch = chain
- sc = single crochet
- hdc = half double crochet
- dc = double crochet
- sl st = slip stitch
- st = stitch
- sp = space
- rep = repeat
Before You Start
Before diving into the pattern, ensure you understand the basic stitches used, particularly how to maintain an even tension for a consistent look. Familiarizing yourself with the triangle increases is essential if you’re constructing your bandana in that style. Remember to check your gauge, as this can impact the size of your finished bandana. Keep track of your rows and take note of any color changes you plan to incorporate.
Free Crochet Bandana Pattern
Starting Chain or Foundation
Begin with a foundation chain of approximately 60-70 chains, depending on your desired size.
First Row
Row 1: Starting from the second chain from the hook, work a single crochet (sc) in each chain across. Turn.
Building the Triangle
Increasing Rows
Row 2: Ch 2 (counts as a dc), dc in the same stitch, then dc in each stitch across to the end of the row. Turn.
Row 3: Ch 2, dc in the first stitch, ch 1, skip a stitch, dc in the next stitch. Repeat from * to * until the end. Turn.
Repeat increasing rows as needed to reach your desired height for the bandana.
Granny Square Motifs
If you choose to incorporate granny squares, make 4 squares measuring 5×5 inches each using basic granny square instructions.
Joining Granny Squares
To join the squares, use a slip stitch to connect each corner. Work in a line or grid, ensuring the squares remain flat and neat.
Decorative Border
Once everything is joined, create a border by working sc around the entire bandana.
Scalloped Edging
Add a decorative scalloped edge by working 5 dc in the same stitch, skip 2 stitches, sl st in the next stitch around the perimeter.
Crochet Ties
To create the ties, chain a length of 40-50 inches, attaching securely to the corners of the bandana with a slip stitch.
Finishing the Bandana
Weave in all the ends and block the bandana to ensure it lays flat and maintains its shape.
Bandana Construction and Assembly
This bandana is primarily constructed by first building the triangle from the foundation chain. If incorporating granny squares, connect these motifs to create a larger structure. Once the central piece is complete, working the ties and decorative borders must be performed to finish the bandana.
Crochet Bandana Edging and Finishing Details
For a polished finish, pay careful attention to securing yarn ends after finishing. If you’ve opted for scalloped edges, make sure each point is clear and evenly spaced. Block the finished piece gently to maintain symmetry and flattening.
How to Wear and Style Your Crochet Bandana
Crochet bandanas can be styled in numerous ways:
- As a classic headscarf tied at the back or side
- A chic summer hair accessory giving a bohemian feel
- Paired with casual outfits for everyday wear
- Styled for beach days or music festivals
Tips for a Better Result
- Maintain consistent tension for smooth edges and a well-proportioned triangle.
- Avoid tight stitches, as they can fold and curl.
- When using multiple colors, keep color changes neat for a professional appearance.
Crochet Bandana Customization Ideas
- Experiment with different yarn colors for unique looks.
- Try contrasting borders for added visual interest.
- Customize tie lengths for versatility in styling.
Common Problems and Troubleshooting
- Uneven triangle shape: Check your tension and stitch count regularly.
- Incorrect stitch counts: Double-check your work at each row’s end.
- Bandana becoming too wide: Revisit your increase rows to ensure consistent spacing.
Care and Maintenance
Care for your crochet bandana based on the yarn’s specifications. Machine wash on a gentle cycle or hand wash, and lay flat to dry. This will help maintain the integrity of the stitches and shape.
Frequently Asked Questions
-
Is this crochet bandana pattern beginner-friendly?
Yes, it’s designed for beginners with step-by-step guidance. -
What yarn is best for a crochet bandana?
Cotton or cotton blends are recommended for breathability and durability. -
How long does it take to crochet a bandana?
Approximately 2-4 hours, depending on your speed and experience. -
Can I make this crochet bandana larger or smaller?
Yes, by adjusting the foundation chain and increasing rows. -
How do I keep the triangular shape even?
Monitoring your tension and consistently working increases will help.
Conclusion
Crocheting your own bandana not only gives you a stylish accessory but also encourages creativity and enjoyment in the craft of crochet. Following this step-by-step pattern will help you achieve a beautiful finished product that you can wear with pride or give as a cherished gift. Happy crocheting!
SEO Title: Easy Crochet Bandana Pattern for Beginners
Meta Description: Discover how to crochet a stylish bandana with this easy, step-by-step pattern. Perfect for beginners with clear photos and instructions!
URL Slug: easy-crochet-bandana-pattern
Primary Keyword: crochet bandana pattern
Secondary Keywords: free crochet bandana pattern, easy crochet bandana, crochet headscarf pattern, handmade crochet headscarf, crochet hair scarf
Image 1 Alt Text: Step-by-step images for the crochet bandana pattern
Image 2 Alt Text: Finished crochet bandana styled for summer wear
Leave a Reply